The your first view on Microsoft
server operating system Windows 2012 will be different than earlier
operating systems. The different interface, Metro icons and missing
elements such as Windows start button/bar are the noticeable changes in
the desktop. By default My Computer icon is also not included and you can’t get it back like how it was in Windows 8
or other versions. Here comes a simple guide about how to show My
computer icon on Windows 2012 server desktop. Also, if you want to add
‘Run’ to Windows task bar for easy accessing, that is also covered here.
Windows
2012 server is more powerful and secured server OS, Microsoft has
enhanced built-in security by not including all features in server OS by
default. To get back most of the desktop experience features like
earlier operating systems, we need to install an additional feature
here. By default you will not find ‘Personalize’ option on desktop menu
which usually leads desktop icons settings.
Sysprobs earlier covered how to show My computer on Windows 8 desktop, but the same method will not work here because of missing Personalize option in menu.
Steps to Show My Computer on Windows 2012 Server Desktop
As
mentioned earlier, this feature is not included by default. If you can
manage the server without seeing My computer icon on desktop or other
personalize options, better continue with default options without
installing additional features. But if you desperately want it, then
continue other steps.
 We must install ‘Desktop Experience’ feature to get back personalize options which will help to get My computer back on Windows 2012 server desktop.
Go to ‘Add Roles and Features’ in server dashboard, select ‘Role-based or Feature-based installation’ , do not select anything in Server Roles, and under Features select ‘Desktop Experience’ as mentioned below.
We must install ‘Desktop Experience’ feature to get back personalize options which will help to get My computer back on Windows 2012 server desktop.
Go to ‘Add Roles and Features’ in server dashboard, select ‘Role-based or Feature-based installation’ , do not select anything in Server Roles, and under Features select ‘Desktop Experience’ as mentioned below.
 Install other required features too.
You must restart the server after the installation.
Install other required features too.
You must restart the server after the installation.
 Even though this feature would have added several options, our concern is to get My computer icon on desktop.
After the restart you must be seeing the ‘Personalize’ from right click menu from desktop (which was not shown in earlier screenshot).
Even though this feature would have added several options, our concern is to get My computer icon on desktop.
After the restart you must be seeing the ‘Personalize’ from right click menu from desktop (which was not shown in earlier screenshot).
 Click on Personalize and ‘Change desktop icons’ at top left corner. It will bring back our traditional desktop icons settings like Windows 7 or 8.
Select the icons you want to show, in our case it is My Computer icon.
Click on Personalize and ‘Change desktop icons’ at top left corner. It will bring back our traditional desktop icons settings like Windows 7 or 8.
Select the icons you want to show, in our case it is My Computer icon.
 That will show My computer icon in Windows 2012 server desktop.
How to Add Run to Windows Task Bar in Windows 2012 Server
To add Run in Windows 2012 server task bar like how Windows PowerShell was already added by default, follow these steps.
That will show My computer icon in Windows 2012 server desktop.
How to Add Run to Windows Task Bar in Windows 2012 Server
To add Run in Windows 2012 server task bar like how Windows PowerShell was already added by default, follow these steps.
 First go to the ‘All Apps’ view. If you are already in Metro UI view you can right click on empty space, then click on ‘All Apps’ icon which will appear at bottom.
 If you are in desktop view, you need move the cursor to top right corner to get more options. Click on ‘Start’ icon to get metro UI, then follow above step to get All apps icon.
Once you can see the all applications, find out Run and right click on it. More options will appear at bottom of the screen. You can select ‘Pin to taskbar’ here, even you can pin Run icon to start menu too.
If you are in desktop view, you need move the cursor to top right corner to get more options. Click on ‘Start’ icon to get metro UI, then follow above step to get All apps icon.
Once you can see the all applications, find out Run and right click on it. More options will appear at bottom of the screen. You can select ‘Pin to taskbar’ here, even you can pin Run icon to start menu too.
 That’s it, we have added Run in Windows 2012 server task bar (and in start menu too)
 Hope this simple guide helps someone here. Stay tuned with Sysprobs for more Windows 2012 server guides.
Here is another Hackintosh guide on desktop virtualization software
VMware workstation 9. This is about latest Mountain Lion 10.8.2 VMware
pre installed image and it is working fine on Windows 7 without any
issues. The image is created and uploaded by souldevteam team and full credits go to them.
Once you update 10.8 through software or manual update, you might face
issue in booting it up again, because the update overwrites kernel files
which will create trouble in restarting. Therefore it is always
recommended to have latest versions from fresh installation and this
image is created from fresh OS X 10.8 with several fixed issues.
You can visit author’s original post here.
This method is for testing purpose only, do not expect all Mac OS X
features as running it on physical apple computer. The fixed issues are;
iMessage in VMware, Ivy Bridge processor support (so the Apple logo
issue while booting should be fixed with Ivy Bridge processors on most
of the latest computers) and good boot time, as per the author’s
statement.
How to Run OS X 10.8.2 on VMware workstation 9
1. Download the image and extract it.
2. Patch the VMware workstation using unlocker.
3. Open virtual machine configuration file
4. Modify VM settings if required
5. Just fire up the 10.8.2 VM.
It should be working fine.
Important Things to Check (Must Check)
1.
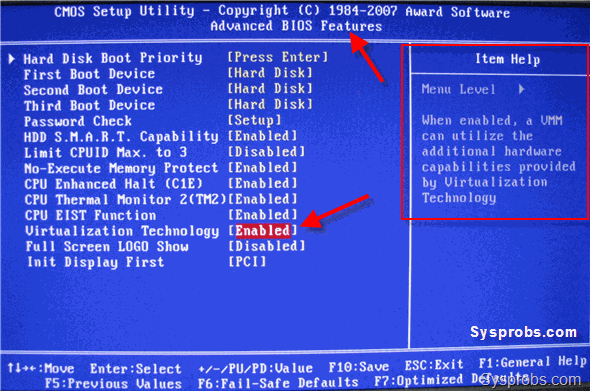
Make sure hardware virtualization technology (VT) is enabled in
motherboard BIOS (of course your processor should have that capability)
 Read our earlier guide about how to enable VT in Intel processor based computers.
2) Your VMware workstation 9 or 8 should be patched by VMware workstation 9 unlocker to be able to run Mac OS X guests.
Read our earlier guide about how to enable VT in Intel processor based computers.
2) Your VMware workstation 9 or 8 should be patched by VMware workstation 9 unlocker to be able to run Mac OS X guests.
 Follow this guide to unlock VMware.
I
could see in earlier articles that readers keep on reporting about the
errors and issues they face without checking above requirements. Again,
make sure above two requirements are met before staring virtual machine.
3) Extract the downloaded zipped file with 7z program in Windows 7
4)
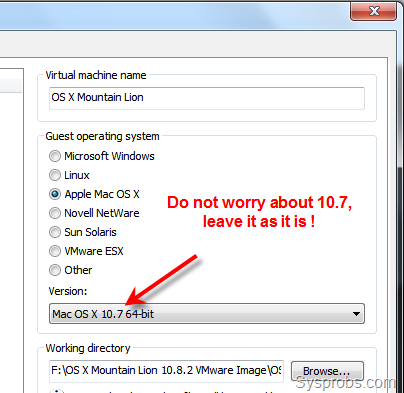
Once you open the ‘OS X Mountain Lion.vmx’ you can notice that guest
version is set to 10.7. Do not change it to 10.8, because I tried and it
never booted for me. So leave it as it is.
Follow this guide to unlock VMware.
I
could see in earlier articles that readers keep on reporting about the
errors and issues they face without checking above requirements. Again,
make sure above two requirements are met before staring virtual machine.
3) Extract the downloaded zipped file with 7z program in Windows 7
4)
Once you open the ‘OS X Mountain Lion.vmx’ you can notice that guest
version is set to 10.7. Do not change it to 10.8, because I tried and it
never booted for me. So leave it as it is.
 5)
You can modify settings (number of processor cores, RAM, network) of
virtual machine if you have enough resources on host computer.
6) Switch on the VM now. Mountain Lion 10.8.2 should start with initial setup screen as below.
5)
You can modify settings (number of processor cores, RAM, network) of
virtual machine if you have enough resources on host computer.
6) Switch on the VM now. Mountain Lion 10.8.2 should start with initial setup screen as below.
 If the virtual machine stuck with Apple logo loading screen, you can try following steps;
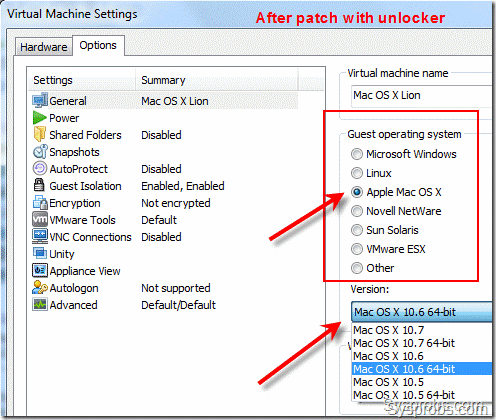
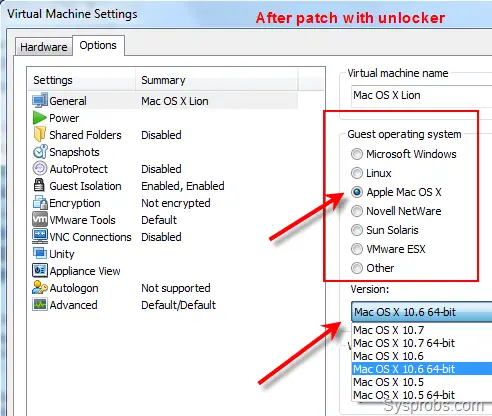
 a) Check Apple Mac OS X guest support under guest operating systems after patching VMware unlocker.
b) Change the number of processor cores.
c) Try to restart virtual machine several times
d) Make sure you are using the latest VMware workstation
Follow our earlier guide to install VMware tools on Mountain Lion 10.8
to get better screen resolutions, slight display performance
improvement and shared folder feature between Lion OS X guest and
Windows 7 host.
If you want to use iMessage in this 10.8.2 VMware pre installed image, you can follow this guide from souldevteam.
a) Check Apple Mac OS X guest support under guest operating systems after patching VMware unlocker.
b) Change the number of processor cores.
c) Try to restart virtual machine several times
d) Make sure you are using the latest VMware workstation
Follow our earlier guide to install VMware tools on Mountain Lion 10.8
to get better screen resolutions, slight display performance
improvement and shared folder feature between Lion OS X guest and
Windows 7 host.
If you want to use iMessage in this 10.8.2 VMware pre installed image, you can follow this guide from souldevteam.
If you are a Hackintosh user on desktop virtualization software
VMware, then the “VMware unlocker” is a compulsory utility to run Mac OS
X lion guests. This unlocker utility replaces few VMware program files
to be able to install and run latest 10.8 and 10.7 Lion OS X guests.
Here is the download links of working unlocker for VMware Workstation 9,
8 and 7 series versions (tested by me) on Windows 7 32 bit host.
UPDATE – This post has been updated after testing latest unlocker (version 1.1.0) with VMware workstation 9 on 08/11/2012
Earlier Mac OS X versions like Snow leopard 10.6 and leopard 10.5 can run on VMware desktop virtualization products without this patch. But the latest Lion OS X needs this patching.
Sysprobs already published a working method to install and run Lion OS X on VMware workstation based on this unlocker. I have demonstrated and tested on Workstation 7 series in previous post, but once I upgraded to VMware workstation 9
or 8, it stopped working. Obviously, the upgrade process replaced
patched files, so no longer I able to run Lion OS X on VMware. Later, I
found a similar patch for 9 and 8 series. Using older ulockers to patch
recent VMware workstation did not work and I could not start any virtual
machines.
Unlocker for VMware workstation 9, 8 and 7
I
have not updated the screenshots for latest 1.1.0 unlocker or latest
VMware workstation 9. The above all screenshots remain same with earlier
versions (almost one year ago). But, I can confirm that latest 1.1.0 unlocker works well with VMware workstation 9 on Windows 7 Host.
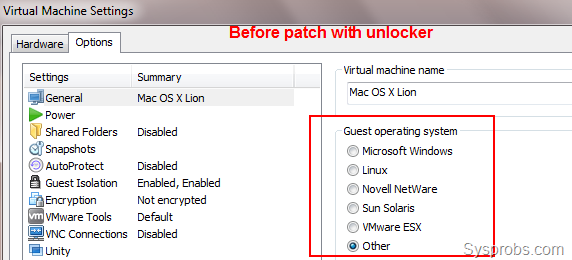
 After applying patch with VMware unlocker – One more Guest OS type and versions.

Unlocker for 9 , 8.0 and 8.0.1 Download Links
This unlocker works well with 9, 8.0 and 8.0.1. All credits go to developer of this patch. You can download and check for the updates and comments here. Make sure you are download the latest version from developer. As on today 1.1.0 is the latest one.
For VMware workstation 7.0 series.
You can download our earlier Sysprobs_lion files set which is having unlocker for 7.0 series.
How to Use Unlocker
Its very simple. Close all VMware programs (if opened)
Extract
the downloaded file. The latest Unlocker is having patch for Windows,
Linux, Fusion 4.0 on Snow Leopard and Lion and VMware ESXi 5.
Before run the patch, its recommended to take a backup of VMware program folder,
because this patch will replace the original files. Even though the
utility takes backup which can be replaced later if required, but its
good to have a backup copy taken by you.
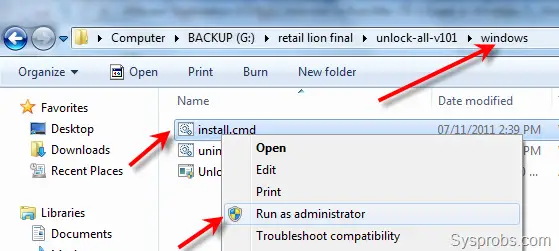
Right click on install.cmd file and select run as administrator
option as shown below. ( or you can start the command prompt as
administrator in Windows 7 computer and execute install.cmd from command
prompt)
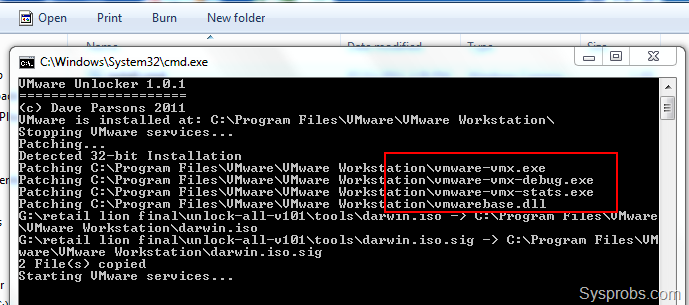
 The successful patch will return the following screen (and disappears automatically)
 That’s
it. You patched the VMware workstation 9, 8.0 or 8.0.1 in Windows 7
host to run Mac OS X Lion guest. Restarting the host computer is not
required here.
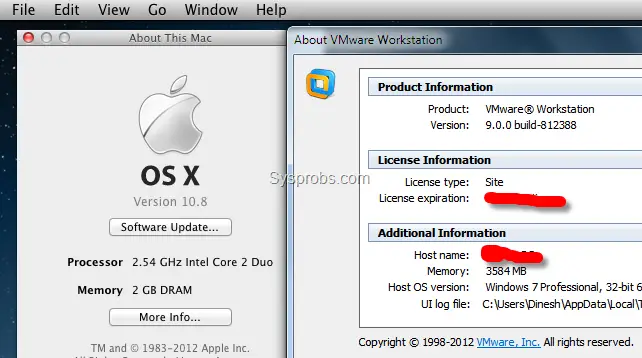
Here is the working Mountain Lion OS X 10.8 in VMware workstation 9 with Windows 7 32 bit host after running unlocker.
That’s
it. You patched the VMware workstation 9, 8.0 or 8.0.1 in Windows 7
host to run Mac OS X Lion guest. Restarting the host computer is not
required here.
Here is the working Mountain Lion OS X 10.8 in VMware workstation 9 with Windows 7 32 bit host after running unlocker.
 I
will be publishing several articles in coming days about running a Lion
OS X with pre installed VMware image based on this VMware workstation 9
unlocker.
I
will be publishing several articles in coming days about running a Lion
OS X with pre installed VMware image based on this VMware workstation 9
unlocker.