Saturday, December 29, 2012

How to Reset Windows 8 and Windows 2012 Server Administrator or User Password – When You Do not Have A Choice

When we forget a user password especially the administrator password in Windows operating systems, that really puts us in difficult situation. By default Windows OS is having few options to recover the forgotten passwords, like password hints and reset disks. Also, you could find few tips to recover them by using OS CD/DVD or system restore points. But how about a situation that nothing is working or you do not have any backup plans to recover the administrator password?. This guide shows how you can use a simple software to reset Windows 8 and Windows 2012 server administrator passwords within a minute.
This Windows 8 password reset tool is not free, it’s a paid and 100% working solution. There are few free password recovery softwares available on internet, but most of them are difficult to use by novice computer users. Even expert users might struggle at the first time with these free utilities.
windows 8 admin password reset

Spotmau BootSuite 2012 is the product used in this guide to reset Windows 8 and Windows 2012 administrator passwords easily. This tool simply removes the particular user password instead of finds it. I prefer this method because finding a password normally takes time as it needs to check with some dictionaries.
Spotmau BootSuite 2012 is not only having Windows password reset tool but also several useful must have tools for your desktop or server computer.
Rescue crashed computer or hard drive, data recovery from crashed computer or hard drive, recover your Windows CD and office product key, partition, format and clean up your hard drive, backup and restore files and system, clone entire hard drive or partition are the other useful utilities you will be getting with this great product.

How to Reset Windows 8 Administrator Password

Once you have downloaded Spotmau BootSuite 2012, you must install it on a computer to make bootable CD.
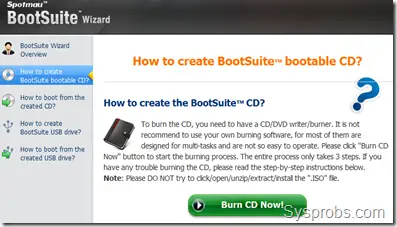
bootsuite cd make
Then insert it to the Windows 8 computer where you need to reset administrator or other users password.
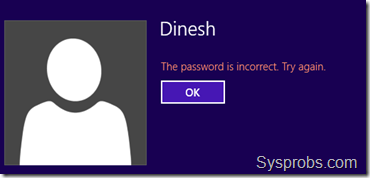
windows 8 error by wrong password
Once the computer booted with Spotmau bootable CD, you can go to ‘Password & Key Finder’ menu as shown below.
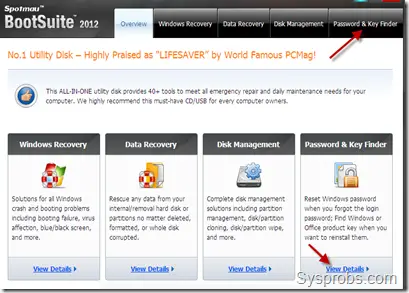
main screen to recover admin password in windows 8
Click on the ‘Admin Password Resetter’ button to reset Windows 8 admin password.
It automatically detects the OS type. You need to select the user from drop down box for resetting.
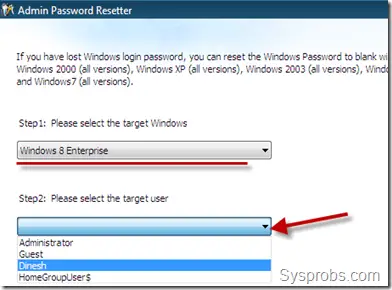
select user
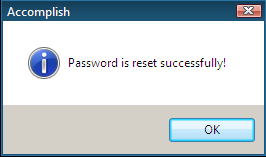
Yes, that is so easy. Just press Reset button and confirm it again. You will get a successful password reset message.
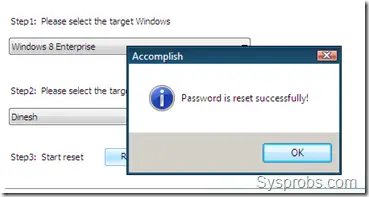
success screen
After password has been reset, you can reboot the PC and login without entering a password for particular user.

How to Reset Administrator Password in Windows 2012 Server
Spotmau BootSuite 2012 works well on Windows 2012 server versions to reset forgotten admin password.
Once you booted server OS with bootsuite CD, you can go to same place to reset admin password. The utility detects 2012 server version automatically. Select the user account that you need to reset the password.
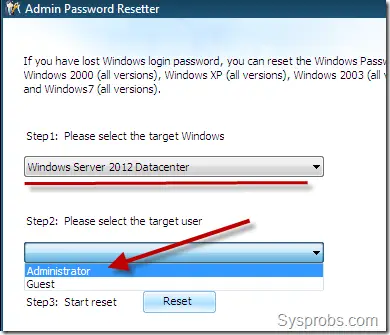

reset screen in windows 2012
It does the job well by removing the forgotten administrator password in Windows 2012 datacenter version. After the password has been successfully reset, you can loing to to server without typing any passwords. Here is my server which logged in with administrator account without any passwords.
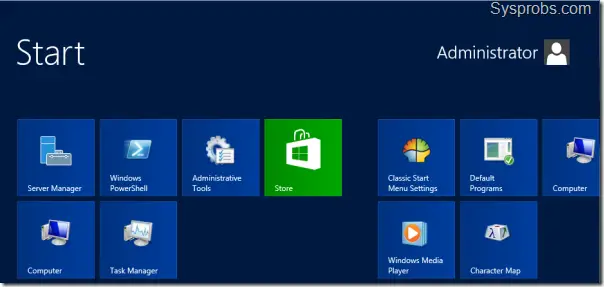
after reset in windows 2012
This product is really good and I’m using it for last three years, it never let me down on desktop or server computers to reset passwords. 100% success password reset rate and 90 days money back guarantee available from software vendor.
Saturday, December 8, 2012

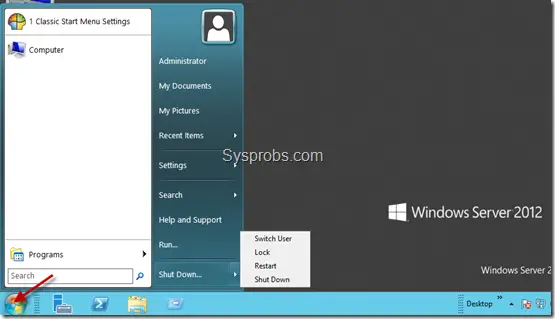
How to Get Start Button and Start Menu in Windows 2012 Server

Here is the way to get back the traditional start menu and start button in Windows 2012 server operating system.Like Windows 8, Windows 2012 server also comes without start button/ menu. Therefore you may feel uneasy while using this OS initially. If you like to get the start button/menu back, you can follow these steps. It works well on Windows 2012 standard and data center versions.

Okay here is an important point, getting back the start button and menu in Windows 2012 is not like showing My computer icon or installing desktop experience, which means it is not a hidden Windows feature that can be installed or enabled in OS level. It can be done by a third party software only. Therefore, before try this method on your production Windows 2012 server, double check whether really you want this feature by installing a third party software. Somehow I do not recommend this in the production environment as these types of applications might open security holes on the server OS. Anyhow, if you are running Windows 2012 in virtualized environment for testing or learning purpose, then you can try this method.
This small start button application built for Windows 8 desktop version, but the same works for 2012 too.

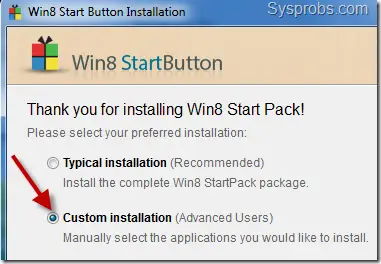
You can download Win8 StartButton from official site here. Your windows 2012 has to have internet connection to continue the installation. I recommend to select ‘Custom installation’ as shown below.
installation
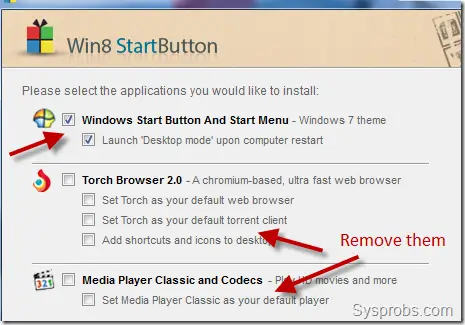
By this custom installation method we can avoid unwanted extra programs during the installation as below.

more options
Once installation is completed, you can see the familiar start button and start menu in Windows 2012 server. To customize this start button and menu, you have to use the particular application settings only. Do not look for the normal Windows settings for it.

installed start button in windows 2012
If you are looking for similar windows 8 start button applications, you can find theme here at cnet.com, but I’m not sure how they will be working on Windows 2012 server.
I have found an interesting article on getting back some of your favorite server GUI features on Windows 2012, you can go through this guide. It explains each steps nicely to work with Windows 2012 server GUI including Background Info (BGI).

Sunday, December 2, 2012

Top 10 Google chrome extensions for bloggers


People like Google Chrome for its speed and simplicity. But there’s another advantage to using it: the vast array of extensions. Along with these features Google chrome also provide a large number of extensions. By using extensions, you can customize Google Chrome with features you like, while keeping your browser free of things that you don’t use. These 10 best Google chrome extensions are from my own favorite and must have extensions, and you could use this as a reference. Hence, can save your time in searching the best among the hundreds of extensions
1. SEO Status Pagerank/Alexa Toolbar
For those working with search engine optimization, this extension is a must-have. To check Alexa and Googe PR of any website. When you open a website, this extension automatically check the ranks. You only need to click on the button, then the information will appear.  

2. Awesome Screenshot:

The name of this extension may be a little over-the-top, but it does its work quite well. Capture whole webpages even if a part of it is visible with this Chrome extension. This extension allows you to capture a whole webpage or a selected area of it, add annotations to a selected area, blur sensitive information and a lot more. This is a lifesaver, containing all the required options in one extension.
 Downlod This Extension.

Almost every Blogger use Google Adsense account for publishing ads to their blog. They need to check their earning each and every time. So why always go to the Adsense home page and check your earning, Install Google Adsense extension and check your earning directly.
 Downlod This Extension.

4. Google Analytic:
This is the most Important Extension where a user can check their blog Analytics. This extension uses OAuth to grant access to your Analytics data through your Google account. So we have to grant the access to our account and OAuth access token can be revoked at anytime in your Google settings. We can see Account name, Visits, Pageviews, Pages/Visit, Bounce Rate, Avg. Time on Site, New Visits, Visitors by installing this extension.  
 Downlod This Extension.

5. SEO for chrome:
This extension is a must-have for any search engine optimization (SEO) professional. It gives you all the tools needed to gather information and provide analysis on any site, including keyword research, competitor analysis, PageRank checks and more.   
Downlod This Extension.

6. Webrank SEO:
Webrank SEO is a search engine optimization tool extension. And it is my favourite chrome extension. Beacuse it include many things. It tell site rank in google, alexa, bing & no. of backlinks for particular search engines. Install it and get full information any website without leaving that website.
Downlod This Extension.

7. YSlow:
YSlow is extension provided for chrome which analyzes any web pages and suggests you the ways to improve performance which are based on some set of rules for high performance web pages. It gives grades to web page based on different criteria. It also offers suggestions for you to improving the page’s performance and all related stuffs  
 Downlod This Extension.

8. Mozbar:
SEOmoz is aslo SEO software. SEOmoz helps to optimize website Search Engine Optimizationwith a detailed analysis of On-Page SEO, Link analysis tool , domain authority,mozRank (mR) and much more. And Mozbar is the name of chrome extension of SEOmoz.   
Downlod This Extension.

9. Word Count:
The name says it all. This chrome extension counts the words and characters that are currently in your selection. This extension can help you when you have a set word limit.  
 Downlod This Extension.

One of the always required tool is Gmail. Almost every one has Gmail account and need to check their mails in real time, so that he/she can reply as soon as possible to build strong relationship with their customers. Therefore, you need to use Gmail chrome extension. This shows you all Gmail notifications in your chrome browser.

Saturday, November 24, 2012

MailChimp vs Aweber : Best Email List Building Software!


Choosing the right email list services provider is critical to any business. Such a service provides valuable targeted visitors to a business’ website, a constant source of traffic, repeat traffic and sales of the services and products of the business. Since this service is a mainstay for any successful business, you should choose an auto-responder service after carefully considering the features offered and those you require for your business. The following guidelines should help you towards that end.
 

Price

MailChimp offers a free subscription option of their service, for an indefinite period of time, but only as long as you have fewer than 2,000 subscribers and you send out fewer than 12,000 emails a month. While this may sound enticing, you do not have access to their full suite of features and services. Excluded from the free subscription are features such as delivery doctor (this tests your campaigns at the click of a button to identify potential problems with consumer ISPs and spam filters), inbox inspector (this ensures your email looks great in major email clients), time warp (ensures email delivery and times of delivery), and the full auto-responder capabilities is not included.

Aweber however, charges $1 for the first month of service and although this trial service provides for only 500 subscribers, it allows unlimited email sending, a 30-day money back guarantee and access to their full-featured service. Following the trial month, Aweber charges $19.99 for the first 500 subscribers.


Interface

In both Aweber and MailChimp the user interface provides many features, tools and functions to learn so the learning curve may be steep for some. Aweber provides many how-to videos for practically everything so you are never at a loss trying to figure anything out. Aweber’s interface may not be as user friendly but it certainly is powerful. MailChimp provides guides and videos as well as a colorful, user friendly interface. The two services seem equally matched as far as their interface is concerned.
 

Form Design Tools

Aweber offers a large variety of custom form designs for your opt-in forms. A wizard allows you to customize the size, wording, font and color elements of the designs. The process focuses more on inbuilt opt-in forms, and although it may be a little slow, you will not run out of design ideas. You may also use these forms to create a mini website and host it on Aweber’s site.

MailChimp provides external opt-in forms that can be used as opt-in pages hosted on MailChimp‘s site. A skilled web designer could make his own forms from scratch using MailChimp’s design tools. The GUI tool can be used even by novices to create designs including pop-ups. The service provides only three templates for onsite forms and they are known as Naked, Classic and Super Slim.
Drafting and Email Design

Although Aweber provides a good choice of email templates to choose from, it does not have very sophisticated text editing software. Care should be taken when text is copied and pasted into the email templates. Aweber has advised they will be releasing a new version of the text editor that will be more user-friendly and will fix current problems experienced by the current editor.
MailChimp however, supplies a large number of email templates, ranging from highly stylized to very basic. The interface for designing HTML emails is very flexible and you may even host images on their site. The site runs much slower however, and that is possibly because of the loaded images used by its user interface.
 

Email Tracking

Aweber provides a sophisticated tracking system that tells which links a subscriber clicked on, when they were clicked and when emails were opened. MailChimp provides no such tracking, and only uses a rudimentary system of placing a star next to a subscriber who opens an email. Conversion tracking is provided by Aweber for those who sell products on their websites, and users of the sites can be traced from the email links to the websites.

Another distinction between the two services is that your domain links in an email are emailed in the exact format with Aweber emails, whereas with MailChimp the links are converted to very long and strange looking links that many subscribers are wary of clicking. The links in the Aweber emails do not look suspicious to readers and using them result in high click through rates.
Auto Responder Efficiency

Aweber and MailChimp manage their email lists differently. Aweber manages its email follow up sequence by assigning a number to each message that goes to its subscribers, and each message is spaced by a certain number of days from the last message. It is always possible to tell which messages were sent to which subscribers. In the MailChimp system, it is possible to send emails to just a few subscribers of a list based on specific criteria. The same is not possible in the Aweber system. Both systems are equally effective in their follow-up methods.
Support

Aweber certainly has the edge over MailChimp in the area of support. Live customer support is available with Aweber Monday through Sundays at specified times by telephone and through live chat, and international customer support is possible with a special number. Support can also be reached through email. The only support available with MailChimp is email, and customers may wait up to 24 hours before they receive a response to their queries.
 

Conclusion

In the end, when considering MailChimp vs Aweber, Aweber’s powerful email follow-up and tracking system, as well as their high email delivery rate, by far outweighs that of MailChimp. In its favor, MailChimp allows greater form design flexibility, but once the form is designed, deliverability and tracking become features for daily monitoring and concern, and that is the strong point for the Aweber system.

MailChimp’s terms of service does not support affiliate marketing whereas Aweber’s does, so an online marketer will need to carefully scrutinize the TOS of the auto-responder he is considering before he makes a decision to purchase.

Aweber’s introductory $1 price for the first month makes it easily affordable for any marketer now starting out, especially as access is given to all resources of the service. When all features and services are considered, Aweber offers a better and more powerful auto-responder service than MailChimp.

BONUS: After buying the Aweber from the button below contact me with receipt no. and I will personally guide you on how to you can quickly increase the numbers of subscribers for your niche , I will design landing pages and squeeze pages for you if needed.

The New Features I like in Oracle VirtualBox 4.2, But Some are with Limitation

Major release of VirtualBox 4.2 came with really long waited new features, especially the features I expected. In this article, I share my personal view on the new features I like in VB 4.2. There is no doubt that VirtualBox is one of the best and free virtualization software which gets updates and new features very frequently.  Official support for Windows 8 and OS X Mountain Lion 10.8 guests, few changes in GUI and  few other extra features are the notable changes on VirtualBox 4.2.
Developers of VirtualBox software are really doing a good job by giving a professional desktop virtualization to us for free. It is completely not fair to compare free VirtualBox and it’s features with other non-free virtualization software like VMware workstation or Parallels. But I’m seeing few limitations on some of the new features that came with VirtualBox 4.2.
You can find out full list of new features and changes on VirtualBox 4.2 in their official blog here.

My Favorite New Features in VirtualBox 4.2

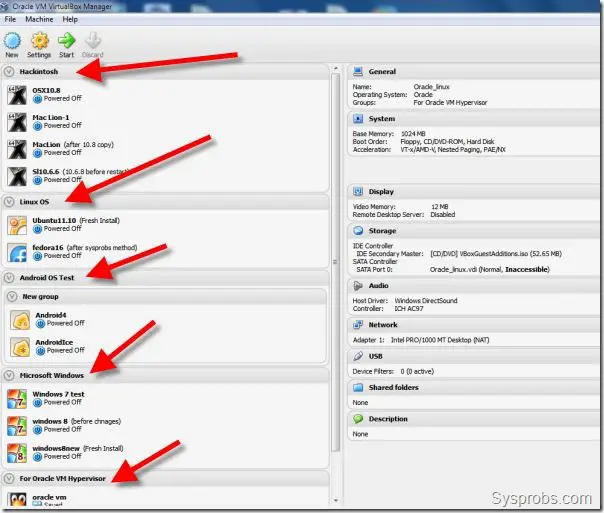
1) Virtual machines grouping
It makes life easy by adding VMs to specific group. When you have more VMs on single host, it will be easy to categorize VMs and use it. Here is the setup of mine after VirtualBox 4.2

VM grouping
To change a VM group name, click on group header and press F2.

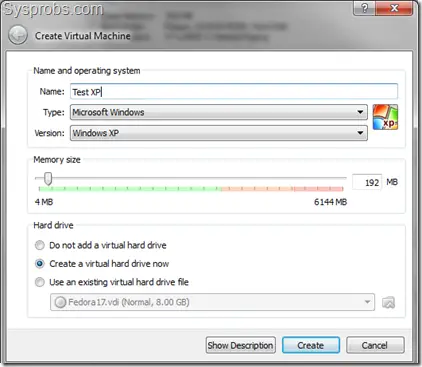
2) Single and Quick new VM creation wizard.
If you are a person creates new VMs frequently, then this method will be very useful. You do not need to go through several screens to create a VM. This is just a single expert mode wizard to create VM with 2 clicks.

quick wizard
Once you press ‘Create’ on above screen, next screen will prompt for the location of virtual hard disk VDI file, after that you are done with creating a virtual machine, it is just by 2 clicks.

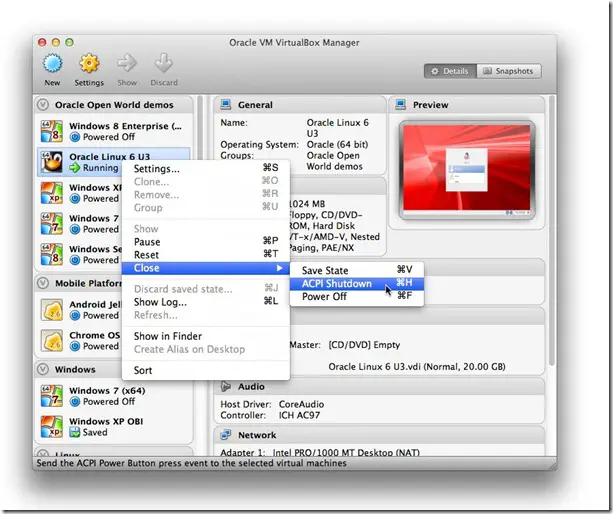
3) Headless VM launching
As you are aware, running a virtual machine in headless mode is a better way to save and reduce consumption of resources on physical computer. If you have a web server or any type of server services running on particular VM which can be accessed from networked computers, then better start that VM in headless mode to reduce load on host. Headless mode will not open separate console to show the running VM and consume extra resources.

On earlier versions, VM can be started in headless mode by command prompt only, but with VB 4.2 it is possible in GUI console also. To start a virtual machine in headless mode, just simply press and hold SHIFT key, then press start. You can shutdown a VM which is running in headless mode by ‘ACPI Shutdown’ (graceful) or ‘Power Off’ options.
headless VM launching
Image credit and read more about new features.

4) Can change few VM settings while it is running
This is really cool. VMware is already having this feature, but had been missing on VirtualBox for long time. In earlier versions I could not add an extra hard disk or virtual network while VM was running, especially if it was a server guest OS on testing environment, then that would be a tough job to shutdown the server for these changes. I mentioned this draw back in my earlier post about ‘still what is missing in VirtualBox’. Luckily it was fixed in latest release.

5) Drag and Drop from Host to Linux guest only.
This is another long waited feature which anyone will like to have it on virtualization software. Even though VMware desktop virtualization products support this feature for long time, VirtualBox is started it from 4.2 version. Unfortunately, this will be working to Linux guest virtual machines only. Because of I have more Windows virtual machines on my host, this is not useful for me. But this is a great initiative from VirtualBox developers as they plan to support other guests also in future.
Find out more information about drag and drop feature for Linux guests.

6) Auto VM stat during host system boot up on Linux, OS X and Solaris hosts.
Again I’m not sure why this is not available for Windows OS hosts, or was it already available?. Going through their reference for ‘auto VM start’ here, I could not find anything useful for Windows host machines. May be there could be a way to write a script with ‘vboxmanage’ command and add it into Windows startup. Any ideas?
Linux, OS X and Solaris users should be happy with this feature to start particular important VMs with host machine start up.


Wednesday, November 21, 2012

How to Show My Computer Icon on Windows 2012 Server Desktop and Add Run to Windows Task Bar

The your first view on Microsoft server operating system Windows 2012 will be different than earlier operating systems. The different interface, Metro icons and missing elements such as Windows start button/bar are the noticeable changes in the desktop. By default My Computer icon is also not included and you can’t get it back like how it was in Windows 8 or other versions. Here comes a simple guide about how to show My computer icon on Windows 2012 server desktop. Also, if you want to add ‘Run’ to Windows task bar for easy accessing, that is also covered here.
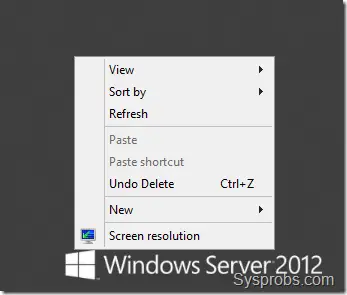
Windows 2012 server is more powerful and secured server OS, Microsoft has enhanced built-in security by not including all features in server OS by default. To get back most of the desktop experience features like earlier operating systems, we need to install an additional feature here. By default you will not find ‘Personalize’ option on desktop menu which usually leads desktop icons settings.
Sysprobs earlier covered how to show My computer on Windows 8 desktop, but the same method will not work here because of missing Personalize option in menu. 

Steps to Show My Computer on Windows 2012 Server Desktop
As mentioned earlier, this feature is not included by default. If you can manage the server without seeing My computer icon on desktop or other personalize options, better continue with default options without installing additional features. But if you desperately want it, then continue other steps.
missing personalize option
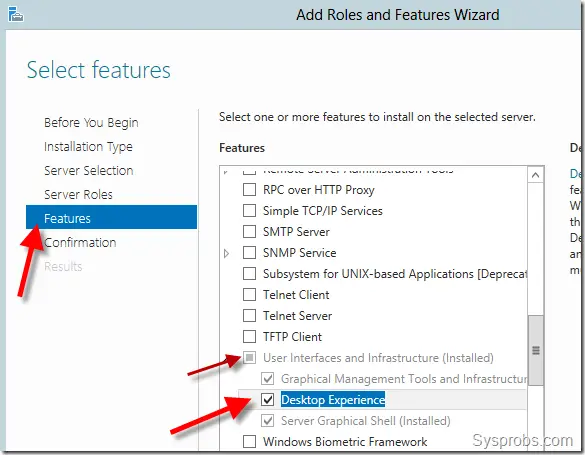
We must install ‘Desktop Experience’ feature to get back personalize options which will help to get My computer back on Windows 2012 server desktop.
Go to ‘Add Roles and Features’ in server dashboard, select ‘Role-based or Feature-based installation’ , do not select anything in Server Roles, and under Features select ‘Desktop Experience’ as mentioned below.

select desktop experience in features
Install other required features too.
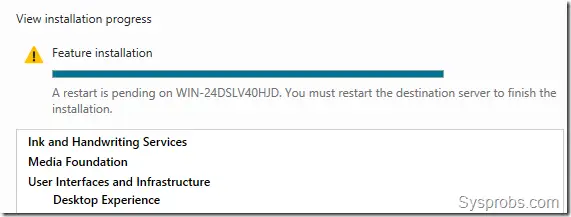
You must restart the server after the installation.

restart screen
Even though this feature would have added several options, our concern is to get My computer icon on desktop.
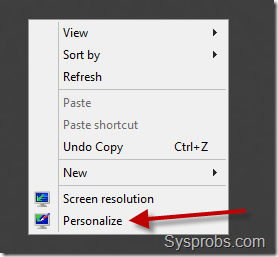
After the restart you must be seeing the ‘Personalize’ from right click menu from desktop (which was not shown in earlier screenshot).

Show My Computer Icon on Windows 2012
Click on Personalize and ‘Change desktop icons’ at top left corner. It will bring back our traditional desktop icons settings like Windows 7 or 8.
Select the icons you want to show, in our case it is My Computer icon.

Show My Computer Icon on Windows 2012
That will show My computer icon in Windows 2012 server desktop.
  
How to Add Run to Windows Task Bar in Windows 2012 Server
To add Run in Windows 2012 server task bar like how Windows PowerShell was already added by default, follow these steps.

windows powershell
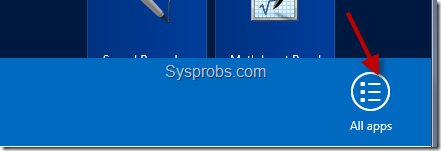
First go to the ‘All Apps’ view. If you are already in Metro UI view you can right click on empty space, then click on ‘All Apps’ icon which will appear at bottom.

all apps
If you are in desktop view, you need move the cursor to top right corner to get more options. Click on ‘Start’ icon to get metro UI, then follow above step to get All apps icon.
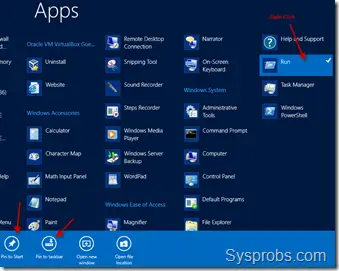
Once you can see the all applications, find out Run and right click on it. More options will appear at bottom of the screen. You can select ‘Pin to taskbar’ here, even you can pin Run icon to start menu too.

right click run to add to windows 2012 task bar or start menu
That’s it, we have added Run in Windows 2012 server task bar (and in start menu too)

added run in windows 2012 task bar
Hope this simple guide helps someone here. Stay tuned with Sysprobs for more Windows 2012 server guides.

Mountain Lion 10.8.2 VMware Image – How to Run it in VMware workstation 9, Windows 7

Here is another Hackintosh guide on desktop virtualization software VMware workstation 9. This is about latest Mountain Lion 10.8.2 VMware pre installed image and it is working fine on Windows 7 without any issues. The image is created and uploaded by souldevteam team and full credits go to them.
Once you update 10.8 through software or manual update, you might face issue in booting it up again, because the update overwrites kernel files which will create trouble in restarting. Therefore it is always recommended to have latest versions from fresh installation and this image is created from fresh OS X 10.8 with several fixed issues.
You can visit author’s original post here. This method is for testing purpose only, do not expect all Mac OS X features as running it on physical apple computer. The fixed issues are; iMessage in VMware, Ivy Bridge processor support (so the Apple logo issue while booting should be fixed with Ivy Bridge processors on most of the latest computers) and good boot time, as per the author’s statement. 
How to Run OS X 10.8.2 on VMware workstation 9

1. Download the image and extract it.
2. Patch the VMware workstation using unlocker.
3. Open virtual machine configuration file
4. Modify VM settings if required
5. Just fire up the 10.8.2 VM.
It should be working fine. 

Important Things to Check (Must Check)

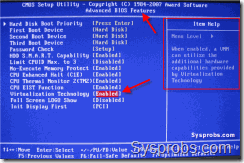
1. Make sure hardware virtualization technology (VT) is enabled in motherboard BIOS (of course your processor should have that capability)
clip_image001
Read our earlier guide about how to enable VT in Intel processor based computers.
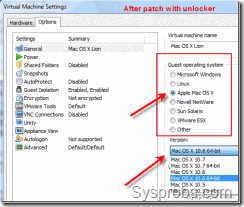
2) Your VMware workstation 9 or 8 should be patched by VMware workstation 9 unlocker to be able to run Mac OS X guests.
clip_image003
Follow this guide to unlock VMware.
I could see in earlier articles that readers keep on reporting about the errors and issues they face without checking above requirements. Again, make sure above two requirements are met before staring virtual machine.
3) Extract the downloaded zipped file with 7z program in Windows 7
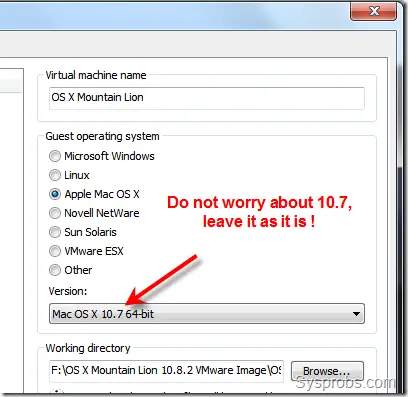
4) Once you open the ‘OS X Mountain Lion.vmx’ you can notice that guest version is set to 10.7. Do not change it to 10.8, because I tried and it never booted for me. So leave it as it is.
Guest OS showing 10.7
5) You can modify settings (number of processor cores, RAM, network) of virtual machine if you have enough resources on host computer.
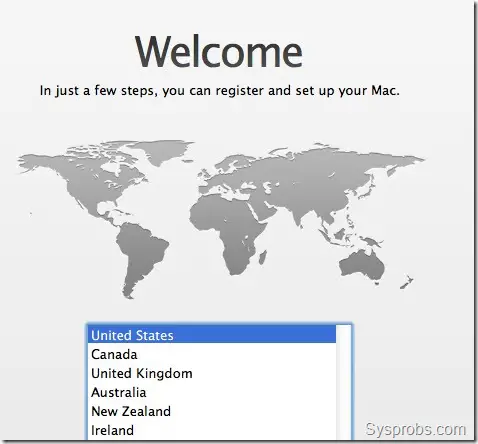
6) Switch on the VM now. Mountain Lion 10.8.2 should start with initial setup screen as below.
initial setup screen
If the virtual machine stuck with Apple logo loading screen, you can try following steps;
clip_image009
a) Check Apple Mac OS X guest support under guest operating systems after patching VMware unlocker.
b) Change the number of processor cores.
c) Try to restart virtual machine several times
d) Make sure you are using the latest VMware workstation

Follow our earlier guide to install VMware tools on Mountain Lion 10.8 to get better screen resolutions, slight display performance improvement and shared folder feature between Lion OS X guest and Windows 7 host.
If you want to use iMessage in this 10.8.2 VMware pre installed image, you can follow this guide from souldevteam.

Tuesday, November 20, 2012

VMware Workstation 9 and 8.0/8.0.1 Unlocker to Run Mac OS X Guests in Windows 7

If you are a Hackintosh user on desktop virtualization software VMware, then the “VMware unlocker” is a compulsory utility to run Mac OS X lion guests. This unlocker utility replaces few VMware program files to be able to install and run latest 10.8 and 10.7 Lion OS X guests. Here is the download links of working unlocker for VMware Workstation 9, 8 and 7 series versions (tested by me) on Windows 7 32 bit host.
UPDATE This post has been updated after testing latest unlocker (version 1.1.0) with VMware workstation 9 on 08/11/2012
Earlier Mac OS X versions like Snow leopard 10.6 and leopard 10.5 can run on VMware desktop virtualization products without this patch. But the latest Lion OS X needs this patching.
Sysprobs already published a working method  to install and run Lion OS X on VMware workstation based on this unlocker. I have demonstrated and tested on Workstation 7 series in previous post, but once I upgraded to VMware workstation 9 or 8, it stopped working. Obviously, the upgrade process replaced patched files, so no longer I able to run Lion OS X on VMware. Later, I found a similar patch for 9 and 8 series. Using older ulockers to patch recent VMware workstation did not work and I could not start any virtual machines. 

Unlocker for VMware workstation 9, 8 and 7

I have not updated the screenshots for latest 1.1.0 unlocker or latest VMware workstation 9. The above all screenshots remain same with earlier versions (almost one year ago). But, I can confirm that latest 1.1.0 unlocker works well with VMware workstation 9 on Windows 7 Host.
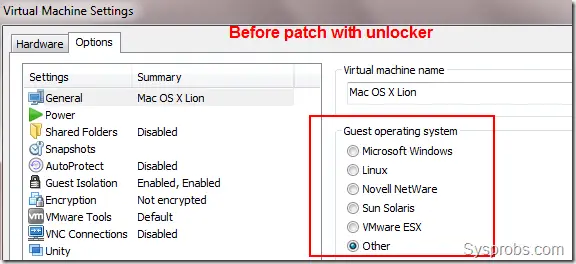
before unlocker
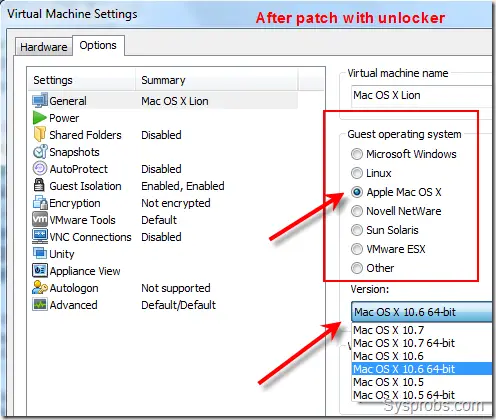
After applying patch with VMware unlocker – One more Guest OS type and versions.

after unlocker

Unlocker for 9 , 8.0 and 8.0.1 Download Links

This unlocker works well with 9,  8.0 and 8.0.1. All credits go to developer of this patch. You can download and check for the updates and comments here. Make sure you are download the latest version from developer. As on today 1.1.0 is the latest one.
For VMware workstation 7.0 series.
You can download our earlier Sysprobs_lion files set which is having unlocker for 7.0 series.
  
How to Use Unlocker
Its very simple. Close all VMware programs (if opened)
Extract the downloaded file. The latest Unlocker is having patch for Windows, Linux, Fusion 4.0 on Snow Leopard and Lion and VMware ESXi 5.
Before run the patch, its recommended to take a backup of VMware program folder, because this patch will replace the original files. Even though the utility takes backup which can be replaced later if required, but its good to have a backup copy taken by you.
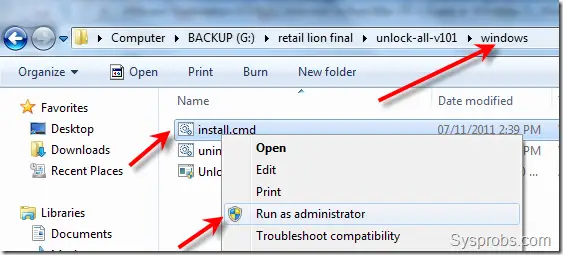
Right click on install.cmd file and select run as administrator option as shown below. ( or you can start the command prompt as administrator in Windows 7 computer and execute install.cmd from command prompt)
right click and patch
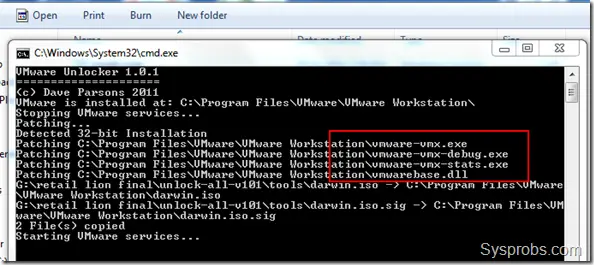
The successful patch will return the following screen (and disappears automatically)

running patch
That’s it. You patched the VMware workstation 9, 8.0 or 8.0.1 in Windows 7 host to run Mac OS X Lion guest. Restarting the host computer is not required here.
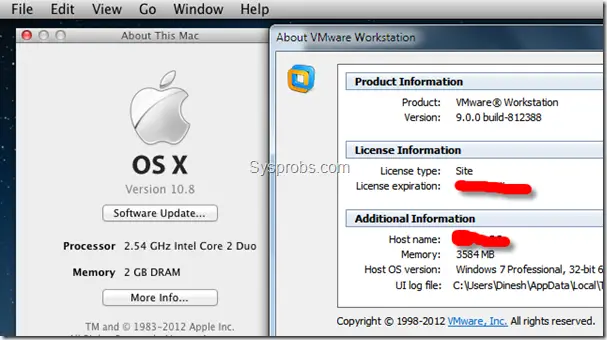
Here is the working Mountain Lion OS X 10.8 in VMware workstation 9 with Windows 7 32 bit host after running unlocker.

working guest
I will be publishing several articles in coming days about running a Lion OS X with pre installed VMware image based on this VMware workstation 9 unlocker.

Thursday, November 8, 2012

How to Determine your Operating System Version

 Windows Computer Version Screen 
 
So if you are new to computers and the way that things inside them work, then one of the things you may be curious about is what operating system your computer uses. There are many ways to find that out, but first, what is an operating system? It is basically a software package that allows for the presence of a user interface (graphical, binary or text) and helps the user establish basic functions with the computer, such as scheduling various tasks, controlling peripheral hardware and installed software management. Common operating systems today include the Windows 7 and Windows 8 platforms that have been launched by Microsoft. Macintosh computer users will be familiar with MAC OS X versions that have come out recently and other users of some of the unconventional operating systems such as Linux or Unix will know them better.

The only thing is, how do you know what version of the operating system you have running on your computer? Here are some simple steps to help you find out which operating system your computer is currently running. There are many different ways to do this.

1) Windows:
To determine which version of windows you have, you can
a) Simply right click 'My Computer' and go to the properties tab. It will show you on the upper right which version your Operating system is.
b) Open the control panel and double click on the system icon. This will also bring about the same window as above, which will detail your operating system version
c) Go to the run dialog box, usually located in your start menu. Type in 'msinfo32' in the dialog box and say ok. The first two lines in the following dialog box should show you which version of windows you are running. The best part about this method is, that it does not matter which windows OS you are running and will show the same dialog box for windows 7, 8, XP or even 98.
d) If you are running windows 7 or vista, go to the windows button and in the search bar type in 'winver'. Your search results should show a program by the same name. Double click the program and then another dialog box should come up which has a more detailed view of your operating system version.


2) Macintosh:
a) Close any active windows and make finder active. Click the apple menu and click 'about this computer'. The window that opens will show the operating system version near the MAC OS icon. 

3) Other Operating Systems:
If you are working on another operating system, then the best way to check the version is to google how to do so. Linux, Unix and other GUI based interfaces will give you step by step instructions on how to determine your operating system, much like this article has.
So that is that. We hope this article has helped you identify your operating system and has helped you become slightly more knowledgeable about your personal computer or macintosh.

Wednesday, November 7, 2012

How to Boot your Computer in Safe Mode

Microsoft Windows Safe Mode Screen
The first thing that you need to do is to take a physical note or a printout of this article. It will most definitely not be available once you restart your computer. The instructions to boot your computer in safe mode are quite simple and you do not even need to note them down if you have a good enough memory.

First, shut down your computer or tell it to restart. When it has finished shutting down and is in the process of starting up, tap the key F8 repeatedly as soon as it comes back to life. You should then see a familiar window that pops up when you have not shut your computer down properly. The dialog box has several options which you can use to start up your computer, however, one of the options there should be 'start windows in safe mode'. There should also be an additional option where you can 'start windows in safe mode with networking'. Depending on your reasons for restarting the computer in safe mode, pick the appropriate option and continue. You should be all set.

However, there are some people who have multiple boot systems, where they can choose to boot into any one of multiple operating systems that they have installed. This is not really a problem, because once you are prompted for which system to boot into, you can press F8 and get the same dialog box as mentioned above. Simply use your arrow keys to select the option and press enter to continue. Works like a charm every time.
Let us also bring about the scenario where you went to get a cup of coffee when your computer did being restarting. If this is the case, then your computer has most probably started up and is not in safe mode. There is no choice here but to restart your system again and keep a vigilant finger on the F8 key.
Safe mode helps you in many ways while running your pc. You will only have access to basic files and drivers in this mode and it is very useful for anyone to run diagnostics on his or her machine. There is a recovery console that is set up in safe mode in case your windows files have gotten corrupted for some reason as well. This is a very effective tool against computers that seem to be a little stubborn with the way they operate. If you cannot seem to boot into regular windows or cannot run a troubleshooting software because of windows interference in regular mode, then safe mode can be a safe way to get what you need to fix your computer's problems.
So safe mode can be useful when it comes to performing system diagnostics. Make sure that you keep the F8 key in mind so that even if you do not have access to this article, starting the computer in safe mode will not be a problem for you. Good luck!

Microsoft Surface Processor and Specifications

Microsoft  Surface Specifications Tablet Processor
The Newly Released Microsoft Surface will be available in a 32 GB ($499), 64 GB ($699) and a 128GB Version with either Windows RT or Windows 8 Pro. The thickness and dimensions of the Microsoft Surface tablet is only at 9.3mm and the screen is 10.6-inches (diagonally) with a Clear Type HD Display. External port connections provided are a microSD slot, a USB 2.0, a Micro HD Video and 2x2 MIMO antennas.
Technical Details / Specifications: ( Quick Specs Sheet / System Overview )
___________________________________________________________________________

Dimensions: 9.3mm thick, 10.81 Length x 6.77 Width
Storage: 32GB, 64GB, 128GB
Operating System: Mircrosoft Windows RT, Microsoft Windows 8 Pro
Display: 10.6" ClearType Full HD Display 1920x1080 pixels 16:9 10-point multi-touch
CPU/Processor: 3rd Gen Intel Core i5 Processor, Quad Core ARM type Processor
GPU/Graphics: Nvidia Tegra 3, Intel HD Graphics 4000
Ram/Memory: 4GB DDR3 RAM - Dual Channel Memory
Wireless: Wi-Fi (802.11a/b/g/n), Bluetooth 4.0 Low Energy
Power: Battery Capacity of 31-42 W-h (Lasts Up to 8 hours)
Other: Dual 720p Cameras ( front and rear-facing ), Built-in Microphone, Stereo speakers
Ports: USB 2.0/3.0, microSD XC card slot, Headset Port, Mini Display Port, Cover port